Note: the instructions in this FAQ apply only to the old User Interface.
Not sure which interface you're using? Click here to work it out!
Here is how the integration works in a snapshot:

DIRECT CUSTOMERS INTEGRATING FOR THE FIRST TIME WITH Intuit's QuickBooks Online:
Squirrel Street's direct integration with QuickBooks works by assigning Squirrel Street receipts into the appropriate QuickBooks account code, then exporting directly into your QuickBooks account.
QuickBooks integration consists of the following steps:
1. The first time you start the integration, it's best to have some documents already in the Receipts section of your Squirrel Street account.2. Login to Squirrel Street and goto to the Receipts page. To the top of your receipts list, click on Export all > Accounting Exports. Then click on the link to start linking Squirrel with your accounting software.

Or alternatively, login to your account and then click on this link

4. If no connection/integration exists, select the correct Squirrel Street account and accounting software from the two drop down menus and click on "Add integration".Follow the setup prompts carefully.

5. After authenticating in Quickbooks, you will be redirected to Squirrel Street, where you'll see the export options available to you.
6. Choose the correct posting method. See this Export Settings help note for more information: - these settings can be modified at a later stage.

7. Once the connection is successful, Squirrel Street will import your most current Chart of Accounts (this is automatic and may take a while depending on the size; it will refresh upon each export attempt).
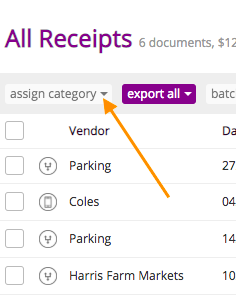
8. Go back to Receipts, and categorise the receipts you've prepared earlier by selecting each receipt and assigning a QBO code from the "Assign category" drop down menu.

10. Login to QuickBooks and locate the transactions.
THINGS TO REMEMBER:
- In the receipts page, you'll see the 'Exported' category added to receipts that have been successfully exported.
~~NOTES FOR CUSTOMERS USING THE OLD (GREEN) QuickBooks Online EXPORT~~
- We have a built-in migration process running in the backend when you link your accounts
- All previously exported receipts will have an exported category added to them. This is to help differentiate between newly added receipts which haven't been exported using the new integration, and receipts previously exported into QuickBooks Online but don't carry a 'QBO - ' category on them
- We have saved your old rules to file. Please drop us a line on help@squirrelstreet.com if you want us to transfer these rules to your new 'QBO - ' categories, or if you'd like a copy of the rules for yourself.