Note: the instructions in this FAQ apply only to the old User Interface.
Not sure which interface you're using? Click here to work it out!
Here is how the integration works in a snapshot:

DIRECT CUSTOMERS INTEGRATING FOR THE FIRST TIME WITH XERO V2
Squirrel Street's direct integration with Xero works by you assigning Squirrel Street receipts into the appropriate Xero account code, then exporting directly into your Xero account.
Xero integration consists of the following steps:
1) The first time you start the integration, make sure you already have at least one receipt entered in your account.
2) Login to Squirrel Street and goto to the Receipts page. To the top of your receipts list, click on Export all > Accounting Exports. Then click on the link to start linking Squirrel with your accounting software.

Or alternatively, login to your account and then click on this link
integrations.squirrelstreet.com
Here's what the Integrations page looks like if you have no integrations:
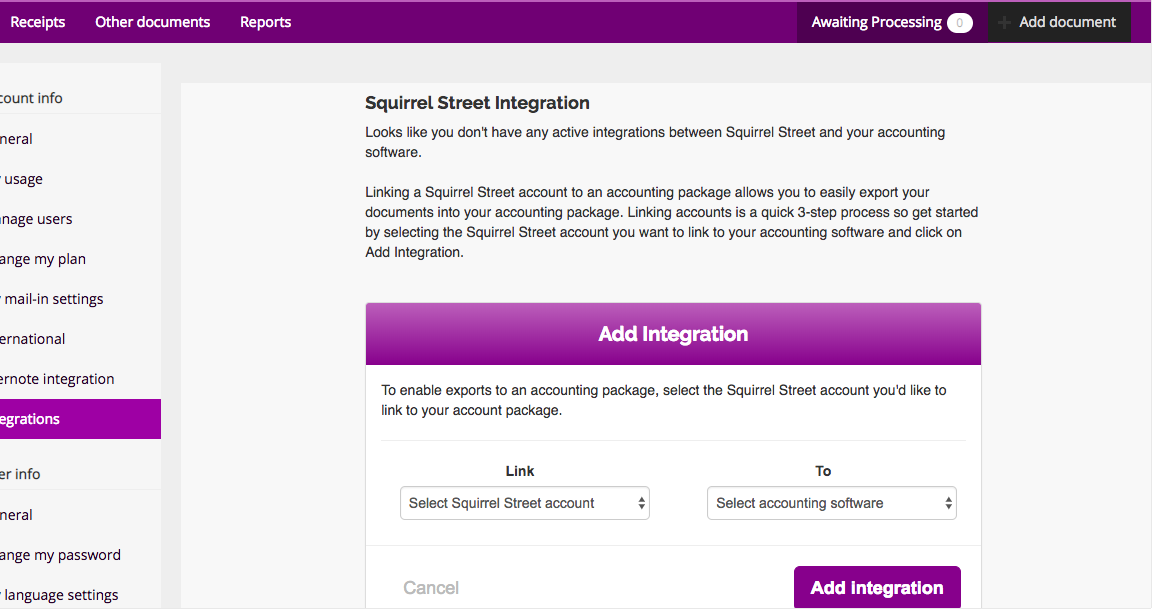
3) If no connection exists, select the correct Squirrel Street account and accounting software from the two drop down menus and click on "Add integration".
4) Follow the setup prompts carefully, and choose the correct posting method. See this help note for more information on export settings. (You can edit your export settings later on if necessary.)
5) Once the connection is successful, Squirrel Street will import your most current Chart of Accounts (this is automatic and may take a while depending on the size. It will refresh upon each export attempt).
6) Go back to Receipts, and categorise the receipts you've prepared earlier by selecting each receipt and assigning a Xerov2 code from the "Assign category" drop down menu. 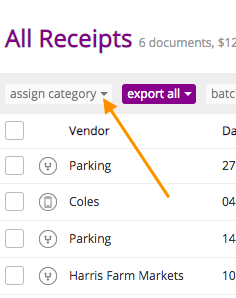
You should now find your Xero Chart of Accounts list! If you have many receipts to categorise, you may want to categorise them in bulk. Instructions can be found here.
7) Export will take place dependent on the settings you selected earlier. Automatic export will mean an export will occur every 2hrs. Manual export will only occur when you click on the 'Export now' button.
8) You can select any already-coded receipts and try exporting them, to test the connection.
9) Login to Xero and locate the transactions.
THINGS TO REMEMBER:
- Only receipts with a 'Xerov2 -' category added will be picked up by the export and added to your Xero account.
- In the receipts page, you'll see the 'Exported' category added to receipts that have been successfully exported.
- If you have receipts that have a Xero category added to them, but you don't want them to be picked up by the export process, add the 'Do not export' category to those receipts, and the export process will skip those.
- If you aren't sure about which export schedule to pick, we recommend leaving it on the Manual setting. Don't worry, you can change these settings at any point in future by using
the Export Settings menu.
The following instructional video shows you step by step instructions:
Login to Squirrel Street and view your receipts. Then go to the integration page
Click on the down arrow
Click on the Squirrel Street account you wish to link
Click on the down arrow
Select "Xero"
Click on "Add Integration"
Click on "OK"
This will take you to Xero. Grant access for Squirrel Street to access your Xero file. You may need to enter your Xero credentials at this point.
Select where in Xero you would like the information to appear
Select whether you would like to manually export each time or have Squirrel Street export automatically (Auto export and Advanced) every two hours, on the hour.
Once the integration has been successful, go back to your receipts page. Xero will have imported its chart of accounts across to Squirrel at this stage.
This is how to code several receipts at a time, by filtering for vendor. Go to the field under "Vendors" and enter the vendor name.
For example, I've entered Coles here.
Click on the top-left box to select all the receipts on the page. (If the list is longer than a page, it's best to do this a page at a time).
Click on "Assign category"
You can use the "Search category" field to find a category. A receipt must have a current Xerov2 category to export successfully.<br>
Once you have successfully coded a receipt, you will be asked if you wish to create a rule, such that newly-entered receipts with this vendor name will automatically be assigned this category. Click on "Create rules" if this is what you want.
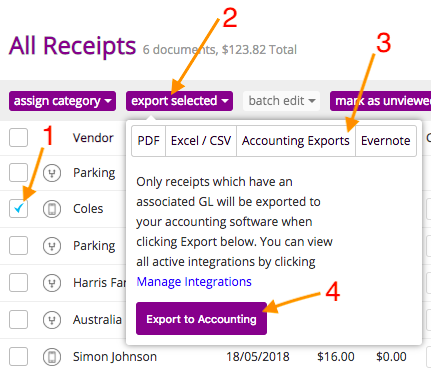
To manually export, click on "Export selected" or "Export all". Both will do the same thing.
Click on "Accounting Exports"
Click on "Export now"
That's it. You're done.